| 일 | 월 | 화 | 수 | 목 | 금 | 토 |
|---|---|---|---|---|---|---|
| 1 | 2 | 3 | 4 | 5 | 6 | 7 |
| 8 | 9 | 10 | 11 | 12 | 13 | 14 |
| 15 | 16 | 17 | 18 | 19 | 20 | 21 |
| 22 | 23 | 24 | 25 | 26 | 27 | 28 |
- Swift Package Manager
- Build Phase
- uFeature
- 아키텍쳐
- 모듈화
- Swift-Web
- tuist 4
- swiftwasm
- Prod
- Dependencies.swift
- Run Script
- SPM
- Tuist
- Stencil
- wasm
- ios
- SwiftLint
- 메모리 구조
- XCConfig
- SwifWeb
- Module
- dependencies
- rethrows
- Publish
- Architecture
- Swift
- Tuist 모듈화
- Micro Feature
- 4.0.0
- Modular Architecture
- Today
- Total
baegteun - iOS
Tuist 사용법 - 7. Configuration + XCConfig 본문
이 글은 Tuist 버전 3.14.0 기준으로 작성되었습니다.
Configuration?
개발, 스테이지, 릴리즈 등의 배포환경을 분리할 때 Build Configuration을 활용합니다.
XCConfig?
Xcode 프로젝트 빌드의 설정을 구성하기 위한 파일입니다.
Configuration 설정법
Settings 를 만들 때 base, configurations, defaultSettings 에서

configurations에 값을 넣어줘서 설정할 수 있습니다.

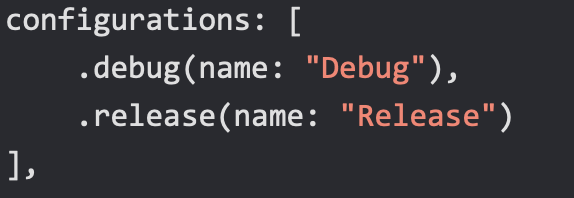
configuration은 debug, release중 하나로 만들 수 있고 configuration별 이름을 정해줄 수 있습니다.

configuration을 만들 때 settings와 xcconfig(경로)를 지정해줄 수 있습니다.
활용
Configuration
configuration을 설정할 때 이름을 정해줄 수 있는데, ProjectDeployTarget 이라는 enum을 만들고 배포환경별로 case를 만들어줍니다.
public enum ProjectDeployTarget: String {
    case dev = "DEV"
    case stage = "STAGE"
    case prod = "PROD"
}
configuration을 설정할때 name은 ConfigurationName 타입입니다. 그렇기에 ConfigurationName에 extension으로 각 배포환경을 선언해놓습니다.
public extension ConfigurationName {
    static var dev: ConfigurationName { configuration(ProjectDeployTarget.dev.rawValue) }
    static var stage: ConfigurationName { configuration(ProjectDeployTarget.stage.rawValue) }
    static var prod: ConfigurationName { configuration(ProjectDeployTarget.prod.rawValue) }
}
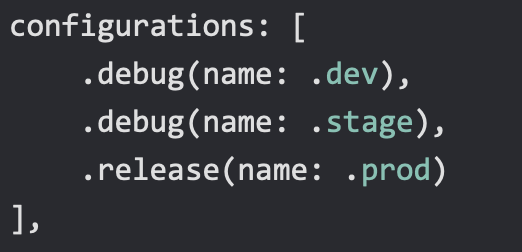
이렇게 해놓으면 configuration을 설정할 때 아래처럼 사용할 수 있습니다.

XCConfig
configuration마다 다른 빌드 설정을 주기위해 XCConfig를 사용해보겠습니다.
저는 프로젝트의 루트 디렉토리에 XCConfig/ 디렉토리를 만들고, 이 안에 (모듈이름)/(configuration).xcconfig 파일들을 넣어주겠습니다.
그리고 XCConfig/ 바로 아래에 Shared.xcconfig 파일을 만들어주겠습니다. 이 파일 안에는
OTHER_SWIFT_FLAGS[config=DEV][sdk=*] = $(inherited) -DDEV
OTHER_SWIFT_FLAGS[config=STAGE][sdk=*] = $(inherited) -DSTAGE
OTHER_SWIFT_FLAGS[config=PROD][sdk=*] = $(inherited) -DPROD
로 내용을 넣어주겠습니다.
그리고 만들어질 모든 .xcconfig 에는
#include "../Shared.xcconfig"으로 Shared를 include 하도록 하겠습니다.
만드는 이유는 각 환경에 맞게 OTHER_SWIFT_FLAGS 값을 추가하여
#if STAGE같이 MACRO로 분기할 수 있도록 하기 위해서입니다.

xcconfig 파일들을 만들고 나서는 configuration을 설정할 때 xcconfig: 에 xcconfig 파일의 경로를 넘겨줘서 xcconfig 설정을 할 수 있습니다.
Additional
Configuration 작업을 한 이후에 Dependencies.swift에 디펜던시를 추가하고 generate를 하게 되면Warning: The project 'Lottie' has missing or mismatching configurations. It has [Debug (debug), Release (release)], other projects have [DEV (debug), STATE (debug), PROD (release)]
라는 메시지가 출력될겁니다. 이는 외부에서 불러온 라이브러리의 Configuration은 저희가 구성한 Configuration과 달리 Debug와 Release로 구성되어있기 때문입니다. 이때는 Dependencies.swift에
import ProjectDescription
import ProjectDescriptionHelpers

let dependencies = Dependencies(
    swiftPackageManager: SwiftPackageManagerDependencies(
        [
            .remote(url: "https://github.com/airbnb/lottie-ios.git", requirement: .upToNextMajor(from: "3.5.0")),
            .remote(url: "https://github.com/uber/needle.git", requirement: .upToNextMajor(from: "0.19.0")),
            .remote(url: "https://github.com/Moya/Moya.git", requirement: .upToNextMajor(from: "15.0.3")),
            .remote(url: "https://github.com/Quick/Nimble.git", requirement: .upToNextMajor(from: "10.0.0")),
            .remote(url: "https://github.com/Quick/Quick.git", requirement: .upToNextMajor(from: "5.0.0"))
        ],
        baseSettings: .settings(
            configurations: [
                .debug(name: .dev),
                .debug(name: .stage),
                .release(name: .prod)
            ]
        )
    )
)
이렇게 baseSettings에 configuration을 설정해주면 됩니다.
References By
https://minsone.github.io/mac/ios/ios-project-generate-with-tuist-2
https://github.com/mephrine/TuistRxTemplate
'Tuist' 카테고리의 다른 글
| Tuist 사용법 - 8. Scaffold, Template를 사용하여 새로운 모듈 만들기 (0) | 2023.02.15 |
|---|---|
| Tuist 모듈화하기 - Modular Architecture 설계하기 (0) | 2023.01.05 |
| Tuist 사용법 - 6. 버전 고정 (0) | 2022.09.19 |
| Tuist 사용법 - 5. Plugin (0) | 2022.08.28 |
| Tuist 사용법 - 4. Script (5) | 2022.08.20 |


